Understanding the Xfinity Router Light Indicators
Your Xfinity router’s lights are like a language. They tell you about your connection’s status.
The Meaning of Different Router Light Colors
Router lights come in different colors. Each one means something specific about your router’s status.
- Green light shows a strong connection.
- White light means everything is working well.
- Blue light indicates the router is trying to connect.
- Red light suggests no internet access.
Always check your router’s manual for exact meanings for each color.
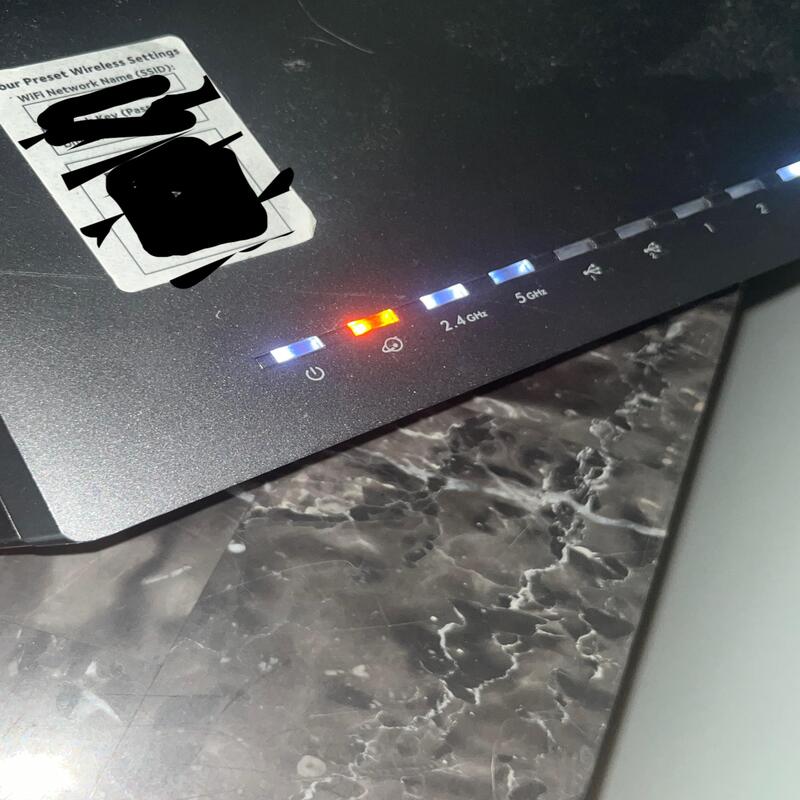
What Does an Orange Light on Your Xfinity Router Signify?
An orange light often points to a problem. It might mean your router is updating or can’t connect to the internet.
If it’s blinking, the router might be updating its firmware. Wait a bit to see if it stops. A solid orange could mean a more serious connection issue. Check connections, see if there’s an outage, or reboot your router as first steps.
Common Causes for Xfinity Router Orange Light
Understanding why your Xfinity router displays an orange light is vital for troubleshooting. Here are some common causes:
Firmware Updates and Their Impact
Firmware updates improve your router’s functionality and security. An orange light might indicate an ongoing update. Do not turn off the router; let the update finish, which could take several minutes.
Issues with ISP Outages
ISP outages can cause connectivity problems. If the orange light persists, check your ISP’s status. You may need to wait for your ISP to resolve these outages.
Potential Hardware Malfunctions
Sometimes routers fail due to hardware issues. If the orange light keeps blinking, it might be a sign of hardware malfunction. Try using another router if possible to test if the issue persists.
Overheating and Overloading Problems
Routers can overheat or become overloaded with too many connected devices. Check for overheating by feeling the router’s temperature. Reduce the number of connected devices to prevent overloading.
Step-by-Step Troubleshooting Techniques
Addressing the xfinity router orange light might seem daunting, but with clear steps, you can often resolve it yourself.
How to Check for Firmware Updates
Firmware controls router operations. Outdated software can cause issues. Here’s what to do:
- Visit the Xfinity website for the latest firmware.
- Download the firmware if an update is available.
- Use your router’s admin panel to install it.
- Follow on-screen instructions or check guides.
- Wait for the update to finish; don’t turn off the router.
Updating your firmware can solve many connectivity problems and improve security.
Steps to Reboot Your Router or Modem
Rebooting often fixes temporary glitches. To reboot:
- Turn off the router.
- Unplug it from the power source.
- Wait one minute.
- Plug it back in.
- Turn the router on.
Rebooting can clear minor router errors and restore connections.
Verifying Cable Connections and Splitters
Loose or damaged cables disrupt your connection. Inspect them:
- Check cable ends for damage.
- Ensure cables are firmly connected.
- Replace faulty cables or splitters.
- Avoid using old or frayed cables.
- If using splitters, make sure they work properly.
Proper cables and splitters are crucial for a stable internet connection.
Advanced Solutions for Persistent Problems
When faced with an unyielding xfinity router orange light, it’s time to explore advanced troubleshooting. These steps often resolve deeper issues.
The Role of a Factory Reset in Troubleshooting
A factory reset returns your router to original settings. This can fix complex problems. It’s like starting fresh. But be warned: it erases all your settings. Before a reset, note down your settings.
To factory reset, find the reset button on your router. Press and hold it for about 10 seconds. The router will reboot with default settings. You’ll then have to re-enter your configuration information.
When to Contact Customer Support
If the reset doesn’t work, it’s time to call for help. Contact Xfinity customer support for guidance. Have your account info ready. Describe the orange light issue clearly. Be ready to follow their instructions.
Assessing the Need for Hardware Replacement
Sometimes, the problem is the router itself. If it’s still under warranty, you might get a free replacement. If not, you may need to buy a new one. Consider this when you’ve tried all other fixes without success.
Before replacing hardware, ensure it’s truly faulty. Try connecting it to different ports or devices. Seek expert advice if needed.
Preventative Measures to Avoid Future Orange Light Issues
To prevent the orange light on your Xfinity router from turning on again, consider the following maintenance and optimization tips.
Regular Maintenance Tips for Your Xfinity Router
Keep your router running smoothly with regular maintenance:
- Check for firmware updates monthly, and install them.
- Clean dust from vents and ports to avoid overheating.
- Restart your router every few weeks to clear temporary glitches.
- Inspect cables and connections for damage, and replace as needed.
- Monitor the number of devices connected to prevent overloading.
Regular upkeep helps maintain a strong and stable internet connection, reducing the chances of future issues.
Optimizing Your Network to Prevent Overloads
Too many devices may burden your router. Here’s how to optimize:
- Disconnect devices not in use from the network.
- Set up a guest network for visitors, separating it from your main network.
- Upgrade to a higher-capacity router if you have many devices.
- Use wired connections for high-bandwidth activities like gaming or streaming.
- Regularly change your Wi-Fi password to kick off unknown devices.
By managing your network effectively, you can prevent overloads that cause connectivity problems, including the dreaded orange light.
When to Seek Professional Help
Sometimes, despite your best efforts, the issue may persist. In such cases, it is a wise decision to seek professional help. There are specific signs that indicate it’s time to contact Xfinity support. Identifying these signs early can save you time and effort.
If the troubleshooting steps fail to resolve the orange light problem, reach out for assistance. Persistent issues often indicate a deeper underlying problem. Customer support can diagnose the situation remotely. They may identify issues that are not immediately apparent or visible.
Understanding Service Plans and Technician Visits
Your Xfinity service plan may cover technician visits. If the issue requires professional attention, don’t hesitate to ask about your coverage. Ensure that you understand what services your subscription includes. This information can guide you in making informed decisions about repairs.
Having a technician visit your home could identify hardware issues. They can replace malfunctioning equipment or perform necessary upgrades. After they assess the situation, you’ll likely feel more confident about your internet service.
Avoiding DIY Repairs
While it can be tempting to troubleshoot extensively, some repairs should be left to professionals. Attempting complex repairs yourself can lead to more issues. If you suspect hardware malfunctions or warranty issues, it’s best to consult a technician. This approach minimizes the risk of further damage or complications.
Furthermore, DIY repairs may void warranties or service agreements. If you find yourself considering complicated fixes, pause and think. Contacting support for assistance is often the most prudent choice. They have the tools and knowledge to resolve even challenging problems.
Additional Resources and Support
Navigating an Xfinity router orange light situation doesn’t have to be daunting. Besides practical troubleshooting steps, further resources and support are available to assist you.
Where to Find Xfinity Router Manuals and Guides
For detailed information on your Xfinity router, the first place to look is the official Xfinity website. Here, you’ll find comprehensive user manuals, quick start guides, and technical specifications for your specific router model. These documents provide valuable insights into light indicators, setup processes, and advanced configurations. Visit the Xfinity support page, enter your router’s model number, and access a wealth of resources tailored to your device.
Community Forums and Technical Support Lines
Engage with other Xfinity users on community forums to share experiences and solutions to common issues. Platforms like Reddit, Xfinity’s own community forum, and other tech forums offer a space to ask questions and receive advice from seasoned users. If you prefer direct assistance, Xfinity’s technical support lines are open. Their customer service can provide step-by-step guidance over the phone. Remember, you’re not alone in dealing with router issues; there’s a community ready to help and professionals available for support.